
티스토리 뷰
🙏 useEffect란?
class Component의 Lifecycle처럼 functional Component에서 Hook을 사용하여 특정 상황에 작업 처리를 가능하도록 해줍니다.
1. class Component Lifecycle
먼저 상대적으로 잘 사용하지는 않지만 이해를 위해 class Component의 Lifecycle를 알아보겠습니다.
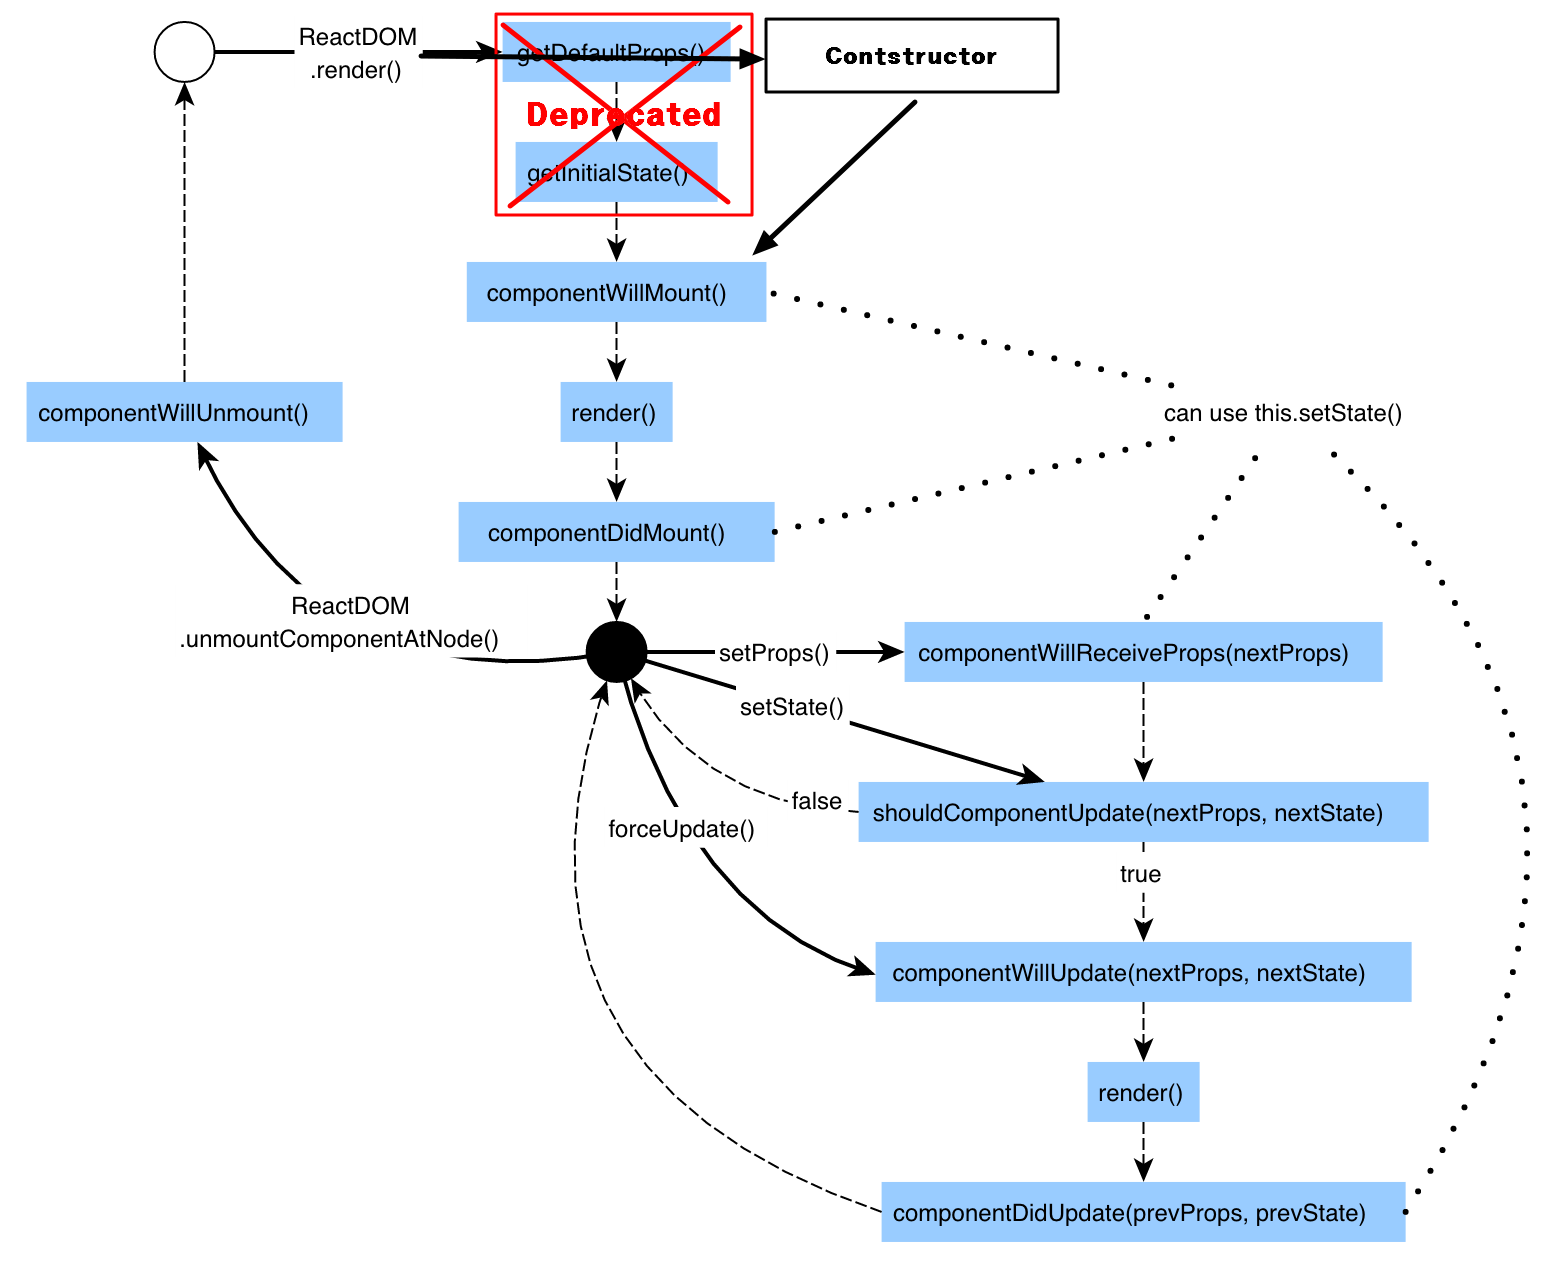
사진에서 추가적으로 React 17.0버전 이후 componentWillMount()와 componentWillUpdate()는 폐기되었습니다.
👀 코드로 알아보기
전체의 파일 구조는 아래와 같습니다.

📂 src>App.js
테스트를 위하여 App.js의 코드는 아래와 같습니다.
import { useState } from "react";
import "./App.css";
import AdvancedFunction from "./components/AdvancedFunction";
import ClassComponents from "./components/ClassComponents";
import FunctionComponents from "./components/FunctionComponents";

function App() {
  const [mode, setMode] = useState("classComponent");
  const [classComponent, setClassComponent] = useState(true);
  const [functionComponent, setFunctionComponent] = useState(null);
  const [advancedFunction, setAdvancedFunction] = useState(null);

  return (
    <>
      <h1>현재 {mode} 컴포넌트 입니다.</h1>
      <div>
        <button
          type="button"
          onClick={() => {
            setMode("classComponent");
            setClassComponent(true);
            setFunctionComponent(null);
            setAdvancedFunction(null);
          }}
        >
          View ClassComponent
        </button>
        <button
          type="button"
          onClick={() => {
            setMode("functionComponent");
            setClassComponent(null);
            setFunctionComponent(true);
            setAdvancedFunction(null);
          }}
        >
          View FunctionComponent
        </button>
        <button
          type="button"
          onClick={() => {
            setMode("advancedFunction");
            setClassComponent(null);
            setFunctionComponent(null);
            setAdvancedFunction(true);
          }}
        >
          View AdvancedFunction
        </button>
      </div>
      {classComponent && <ClassComponents />}
      {functionComponent && <FunctionComponents />}
      {advancedFunction && <AdvancedFunction />}
    </>
  );
}

export default App;
📂 src>components>ClassComponents.jsx
먼저 ClassComponents의 코드는 아래와 같습니다.
import React, { Component } from "react";

class ClassComponents extends Component {
  constructor(props) {
    super(props);
    this.state = {
      number: 1,
    };
  }
  // componentWillMount() {
  // 폐기
  // }
  componentDidMount() {
    document.title = "index.html";
    console.log("화면이 그려지고 난 후", this.state.number);
  }
  shouldComponentUpdate(nextProps, nextState) {
    console.log("-------------------상태 업데이트 감지", this.state.number);
    return true;
  }
  // componentWillUpdate() {
  // 폐기
  //   getSnapshotBeforeUpdate() 으로 대체
  // }
  componentDidUpdate() {
    console.log("업데이트 완료", this.state.number);
  }
  render() {
    console.log("화면 그려짐", this.state.number);
    return (
      <div>
        <h2>클래스 컴포넌트 </h2>
        <span>{this.state.number}</span>
        <button
          type="button"
          onClick={() => {
            this.setState({ number: this.state.number + 1 });
          }}
        >
          CLICK ❗
        </button>
      </div>
    );
  }
}

export default ClassComponents;

현재는 componentWillMount()는 폐기가 되었기때문에 렌더링이 되면 render() -> componentDidMount() 순으로 실행이 됩니다.
- 참고로 componentWillUpdate()는 getSnapshotBeforeUpdate()로 대체되었습니다.

이때 버튼을 클릭하여 number의 값을 증가시켜보겠습니다.

버튼을 클릭하여 setState의 state가 변경되면 shouldComponentUpdate()가 먼저 실행이되고 true를 리턴하고 있기 때문에 render()를 다시 실행하고 componentDidUpdate()를 실행하게 됩니다.

2. functional Component with Hooks
위에서 알아본 class Component의 Lifecycle처럼 functional Component에서도 Hooks를 이용하여 작업이 가능합니다.
💡 React 16.8 이후의 React-Hooks에서는 useEffect 뿐만아닌 상태관리, 성능등의 Hooks API를 제공하고 있습니다.
[React-Hooks APIs] (https://reactjs.org/docs/hooks-reference.html)
👀 코드로 알아보기
📂 src>components>FunctionComponents.jsx
Hooks에서는 useEffect()를 사용하면 Lifecycle를 관리할 수 있으며 componentDidMount(), componentDidUpdate(), componentWillUnmount()의 기능을 사용하고 코드는 아래와 같습니다.
💡 useEffect() 구조 알아보기
들어가기전 useEffect()의 기본 구조를 보자면useEffect(effect: EffectCallback, deps?: DependencyList)위와 같은 구조로 되어있습니다.
첫번째 인자값으로는 실행할 콜백함수, 두번째 이후에는 의존성을 위한 deps값을 넣게 되어있습니다.React에서는 useEffect안에서 사용되는 상태나 props가 있다면 deps에 넣어줘야하는게 규칙입니다.
만약 deps를 넣지 않는다면 함수가 실행될 때 최신의 상태를 가르키지 않게됩니다. (의존성)이 기본 구조를 잘 기억하시고 아래의 내용을 이어나가시길 바랍니다.
import React, { useEffect, useState } from "react";

const FunctionComponents = () => {
  const [number, setNumber] = useState(1);

  useEffect(() => {
    console.log("---------FunctionComponents");
    console.log("componentDidMount & componentDidUpdate");
    console.log("숫자 설정 됨", number);
    document.title = number;
    return () => {
      console.log("---------- cleanup ");
      console.log("숫자 변경 전", number);
    };
  }, [number]);

  const onNumber = () => {
    setNumber((number) => number + 1);
  };

  return (
    <div>
      <h2>함수형 컴포넌트 </h2>
      <span>{number}</span>
      <button type="button" onClick={onNumber}>
        CLICK ❗
      </button>
    </div>
  );
};

export default FunctionComponents;

기본적으로 렌더링이 될 시에는 return이전의 코드를 실행합니다.

여기서 버튼을 클릭하여 setNumber의 state를 업데이트 해보겠습니다.


useEffect()는 state의 변화가 생겨 리렌더링의 상황이 되면 업데이트가 되기전 내부의 return이 있다면 먼저 실행이 됩니다. 이때 return은 함수를 리턴해야하며 clean-up 함수라고 합니다.
💡 clean-up 함수란?
useEffect()에서 EffectCallback의 return함수입니다.
component의 Unmount/Update의 작업을 하기전 수행하려는 함수를 말합니다.
생략이 가능하나 만약 clean-up함수를 사용하면 clean-up 실행 -> render -> EffectCallback의 순서로 실행됩니다.
🎉 활용하기
그럼 useEffect()를 어떻게 활용하면 좋을지 알아보겠습니다.
👀 코드로 알아보기
📂 src>components>AdvancedFunction.jsx
코드는 아래와 같습니다.
🔑 Key Point
useEffect()는 deps의 파라미터 값들이 업데이트 됐을때 componentDidUpdate() 처럼 실행됩니다.
컴포넌트에서 각각의 state변화에따라 어떻게 실행되는지 알아가시길 바랍니다.
import React, { useEffect, useState } from "react";

const AdvancedFunction = () => {
  const [number, setNumber] = useState(1);
  const [date, setDate] = useState(new Date().toString());

  useEffect(() => {
    console.log("숫자 설정 됨", number);
    return () => {
      console.log("cleanup");
      console.log("숫자 변경 전", number);
    };
  }, [number]);

  useEffect(() => {
    console.log("날짜 설정 됨", date);
    document.title = date;
    return () => {
      console.log("날짜 변경 전", date);
    };
  }, [date]);

  const onNumber = () => {
    setNumber((number) => number + 1);
  };
  const onDate = () => {
    setDate(new Date().toString());
  };

  return (
    <div>
      <h2>활용 하기</h2>
      <div>
        <h3>숫자 변경 </h3>
        <span>{number}</span>
        <button type="button" onClick={onNumber}>
          CLICK ❗
        </button>
      </div>
      <div>
        <h3>날짜 변경 </h3>
        <span>{date}</span>
        <button type="button" onClick={onDate}>
          CLICK ❗
        </button>
      </div>
    </div>
  );
};

export default AdvancedFunction;


컴포넌트가 렌더링 되니 두개의 useEffect()가 실행된걸 확인 하였습니다.
여기서 숫자 변경 버튼을 먼저 클릭 해보겠습니다.


위와 같이 setNumber()의 state만 변경이 되니 number의 deps를 가진 useEffect()만 실행 되었습니다.
이번엔 날짜 변경 버튼을 클릭 해보겠습니다.


이처럼 useEffect()는 가지고있는 해당 deps의 변화에만 맞춰서 사용이 가능합니다.
💡 Bonus
[] 빈 배열만 넣으면 componentDidMount로만 사용이 가능하다
뎁스 []를 생략하게 되면 데이터 페칭을 할때 무한루프에 빠지는데 이게 없으면 매 렌더마다 실행되기 때문에
만약 컴포넌트가 Unmount 될때의 처리를 위해서는 어떻게 해야할까요?
👋
'React' 카테고리의 다른 글
| 🤩 React-Router (0) | 2021.08.19 |
|---|---|
| 😋 Context API (0) | 2021.08.17 |
| 🛠 에러 픽스하기 - 데이터 변환 (1) | 2021.07.08 |
| 🙎♀️ 조건부 렌더링 (0) | 2021.04.05 |
| 😯 useState()는 동기? 비동기? (1) | 2021.04.01 |
- Total
- Today
- Yesterday
- baegofda
- 공공데이터포털
- 공공데이터
- react
- 개발자회고
- axios
- 노드JS
- 프론트엔드면접
- 프론트엔드개발자
- INPUT
- vue입문
- font-family
- JavaScript
- HTML
- vue예제
- nodejs
- vue3
- 생활코딩
- cssom
- 프론트엔드회고
- CORS
- 프론트엔드
- function
- CSS
- 리액트
- VanillaJS
- vue
- 오물오물
- postman
- inline
| 일 | 월 | 화 | 수 | 목 | 금 | 토 |
|---|---|---|---|---|---|---|
| 1 | 2 | 3 | 4 | 5 | 6 | |
| 7 | 8 | 9 | 10 | 11 | 12 | 13 |
| 14 | 15 | 16 | 17 | 18 | 19 | 20 |
| 21 | 22 | 23 | 24 | 25 | 26 | 27 |
| 28 | 29 | 30 |